Dealing with a leaky or damaged roof can feel really stressful. You know it needs fixing, but understanding the whole roof repair process might seem like a big puzzle. What actually happens when you call a roofing company?
Getting a handle on the roof repair process helps you feel more in control and less worried about the work happening above your head. It allows you to anticipate the steps involved and communicate effectively with your chosen roof contractor. This knowledge can reduce anxiety about potential disruptions and costs.
You probably have lots of questions. How long will it take? What mess will it make? How much disruption should you expect? This guide walks you through what usually happens in the roof repair process, from the first phone call to the final handshake, so you know exactly what’s coming.
Knowing the steps involved makes choosing a reliable roofing contractor easier too. It helps you ask the right questions and understand the answers you get back. Let’s break down the typical workflow for repairing roof issues.
Your roof does more than just keep the rain out; it’s a critical part of your home’s structure, acting as the first line of defense against the elements. It protects everything inside, including your family, belongings, and the structural components of your house. Maintaining a healthy roof is essential for overall home safety and stability.
A damaged roof can lead to bigger problems fast if neglected. Small leaks can cause significant water damage over time, leading to issues like mold growth, ruined insulation, water seepage into walls, and even weakened wooden structures in your attic and ceilings. These potential problems can compromise your home’s integrity and air quality.
Ignoring roof problems doesn’t make them go away; it usually makes them much worse and more expensive to fix later. Addressing roof repairs quickly protects your home’s value, prevents escalating damage, and keeps your living environment safe. Prompt action helps prevent water from causing extensive harm.
Okay, so you suspect a problem or just want a checkup for your regular roof maintenance. The very first step in any professional roof repair process is a detailed roof inspection. You’ll want a qualified professional roofer or roofing contractor to perform this evaluation.
They won’t just glance at it from the ground; a proper inspection involves getting up on the actual roof surface. They’ll carefully examine the entire area, looking for obvious damage like missing, cracked, or broken roofing shingles. They also check for less obvious signs like loose nails or blistered areas.
They pay close attention to potential weak spots, which are often areas prone to leaks. This includes the flashing around chimneys, vents, skylights, and wall intersections, as well as the seals around pipe boots. They’ll look inside the attic too, searching for signs of roof leaks, water stains on the underside of the roof deck, moisture on insulation, or signs of poor ventilation contributing to moisture buildup.
During the roof inspection, roofing professionals are trained to spot things you might easily miss. They systematically check various roofing components:
This thorough look helps them understand the full picture of your roof’s health. It’s not just about finding the existing roof leak; it’s about identifying the root cause and any other potential problems. A good inspector documents everything, often taking photos or videos to show you exactly what they found during the regular inspections.
After the comprehensive roof inspection, the roofing contractor provides you with a written estimate. This document should be more than just a price tag. It should clearly outline the specific problems found, the proposed solutions for the roof repairs, and the scope of work involved.
A good estimate details the specific tasks required, such as replacing damaged asphalt shingles or repairing flashing. It lists the types and quantities of roofing materials they plan to use, specifying things like shingle type/color, underlayment, starter shingles, and metal drip edge. It also breaks down the labor costs involved and estimates the project timeline.
This document is really important for understanding the repair cost and what work will be performed. Transparency here is crucial – you should feel comfortable asking questions about any part of the estimate, including material choices or labor charges. Ask about their process and how they plan to protect your property.
Roof repair costs can vary significantly based on several factors. The extent and type of roof damage play a major role, as does the type of roofing material being repaired (asphalt shingle repair cost differs from metal or tile). The pitch (steepness) of your roof and how easy it is for the roofing crew to access the work areas can also influence labor costs.
The estimate should include a complete breakdown: materials (including specific items like roofing nails and pipe boots), labor, permit fees (if required by your local municipality), and debris disposal/cleanup fees. Clarify payment terms, including any required deposit and the final payment schedule. Also, inquire about any warranties offered on both the roofing materials used and the workmanship provided by the roofing company.
Once you approve the estimate and plan, the roofing crew prepares your property for the repair work. Protecting your home and landscaping is a priority for any professional roofing contractor. They take specific steps to minimize disruption and prevent potential damage during the roof repair process.
This preparation usually involves covering nearby landscaping, such as shrubs, flowerbeds, and sensitive lawn areas, with tarps. They might need to move patio furniture, grills, potted plants, or vehicles away from the immediate work zone around the house. Setting up tarps strategically around the foundation helps catch falling debris, especially old roofing shingles and fasteners.
The goal is to keep the area safe for both the crew and your family, and as clean as possible during the job. They will also coordinate the delivery of roofing materials and stage their equipment efficiently, often designating specific areas for dumpsters or supply storage. Good preparation before the actual install day helps the repair work proceed smoothly and safely.
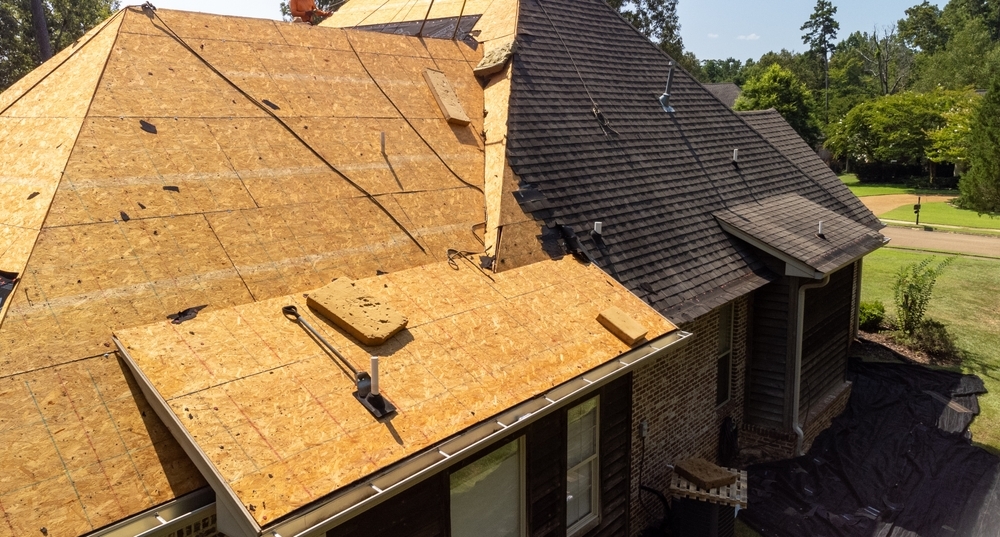
Now the actual roof repair work begins. Depending on the extent of the roof damage identified during the inspection, this stage can vary significantly. For minor issues, it might involve replacing a few damaged or missing asphalt shingles, resealing flashing, or replacing a cracked pipe boot.
If there’s more significant damage, such as widespread shingle loss or underlying water damage, the process is more involved. The roofing crew might need to carefully remove the old, damaged roofing shingles in the affected area first. They will then thoroughly inspect the exposed wood decking (also called the roof deck) for signs of rot, softness, or water damage; any compromised decking must be repaired or replaced before new materials can be installed to provide a solid base.
The crew then proceeds with installing new roofing components. This typically starts with installing ice and water shield membranes in vulnerable areas (eaves, valleys, around penetrations) followed by the underlayment over the roof deck. Next comes the installation of metal drip edge along the eaves and rakes, followed by starter shingles, and then the main field shingles, carefully matching your existing shingles roof color and style as closely as possible. Proper shingle installation techniques, including correct nailing patterns with appropriate roofing nails, are critical.
They will also address any identified issues with flashing installation around chimneys, vents, skylights, or walls, repairing or replacing flashing as needed to prevent water intrusion. Repairing a flat roof often involves different materials and techniques compared to sloped roofs, focusing on seamless membranes and proper drainage to avoid standing water. Throughout the process, they take care to cover roof sections if work needs to pause overnight or if unexpected rain occurs.
Sometimes, removing old roofing materials reveals hidden problems not visible during the initial inspection. For instance, the extent of water damage to the roof deck might be greater than anticipated, or structural issues could be uncovered. A professional roofing contractor will pause work immediately upon discovering such issues.
They should clearly explain the newly discovered problem, often showing you photographic evidence. They will then discuss the necessary changes to the repair plan, including any impact on the cost and timeline, and provide a revised estimate or change order for your approval before proceeding. While finding more damage isn’t ideal, addressing it properly during the repair is crucial for the long-term health and integrity of your actual roof and helps prevent future, potentially more costly, problems. Sometimes, extensive hidden damage might shift the project from a repair to a full roof replacement project.
After the main repair work is completed, the job isn’t quite finished. The roofing contractor or their site supervisor performs a final quality control inspection. They carefully review the repaired area and surrounding sections.
They check that all new roofing shingles are properly aligned, secured according to manufacturer specifications, and that the sealing strips have adhered correctly. They double-check that all flashing and seals around pipe boots, vents, and other penetrations are completely watertight. Any exposed roofing nails heads should be properly sealed to prevent future rust and potential roof leaks.
This internal quality check is an important step for reputable roofing professionals. It helps catch any minor oversights or details needing adjustment before they consider the job complete. This process confirms the repairs meet industry standards, manufacturer requirements for installing shingles, and fulfill the scope outlined in the agreed-upon contract, making sure water doesn’t find a way in.
A truly professional roofing company understands that the job isn’t done until your property is left clean. Their roofing crew conducts a thorough cleanup of the entire work site. This includes your yard, driveway, walkways, patios, and garden beds.
They pick up all construction debris, old materials, stray fasteners, and packaging. Many crews use large rolling magnets across the lawn and driveway to meticulously collect any dropped or loose nails, protecting your family, pets, and vehicle tires. Your property should look as good as, or better than, it did before they arrived, signifying a truly roof clean completion.
Once the cleanup is finished, the contractor or site lead typically conducts a final walkthrough with you, the homeowner. This is your opportunity to inspect the completed work yourself, ask any remaining questions, and point out anything you’re concerned about. Reputable contractors want to confirm you are completely satisfied before processing the final payment.
Understanding the roof repair process doesn’t have to feel like a huge burden. Knowing each step, from the initial roof inspection and estimate gathering to the actual repair work and final cleanup, empowers you as a homeowner. You can approach the situation with more confidence, ask informed questions, and feel assured that the job is done correctly.
1727 Clearwood Dr, Longview, TX 75604
Mon - Sat: 7am - 8pm
Sun Closed
Call us for a free estimate
903-790-1964